

If you’re managing a WordPress site with high traffic or unpredictable spikes in visitor numbers, load balancing is a crucial tool to ensure uptime and performance. Google Cloud Platform’s (GCP) Load Balancer is a powerful, reliable solution designed to distribute inbound traffic across multiple servers effectively. But how do you integrate this tool into your WordPress website? This guide will walk you through the fundamentals of GCP Load Balancing, its benefits, how it works, and how you can implement it on your WordPress site.
What is GCP Load Balancing?
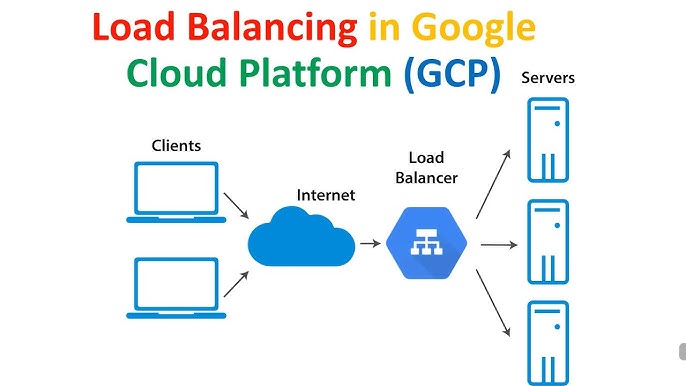
Google Cloud Platform’s (GCP) Load Balancing is a fully managed service that automatically distributes incoming traffic across multiple backend instances or servers. Whether your website serves users locally or globally, GCP Load Balancer ensures traffic is intelligently routed to avoid overloading any single server.

Unlike traditional solutions that are hardware-based, the GCP Load Balancer is a software-defined service. It runs on Google’s global network, ensuring high availability, scalability, and lightning-fast performance for applications — including WordPress sites.
Why Do You Need a GCP Load Balancer?
The long-term success of a WordPress site heavily depends on performance and uptime. GCP Load Balancing can help you overcome some of the most common issues faced by system administrators and developers:
1. Better performance during traffic spikes.
Imagine launching a new campaign or going viral on social media. Without a load balancer, a sudden surge in visitors could overload your server, leading to crashes or slow performance.
2. Global distribution of users.
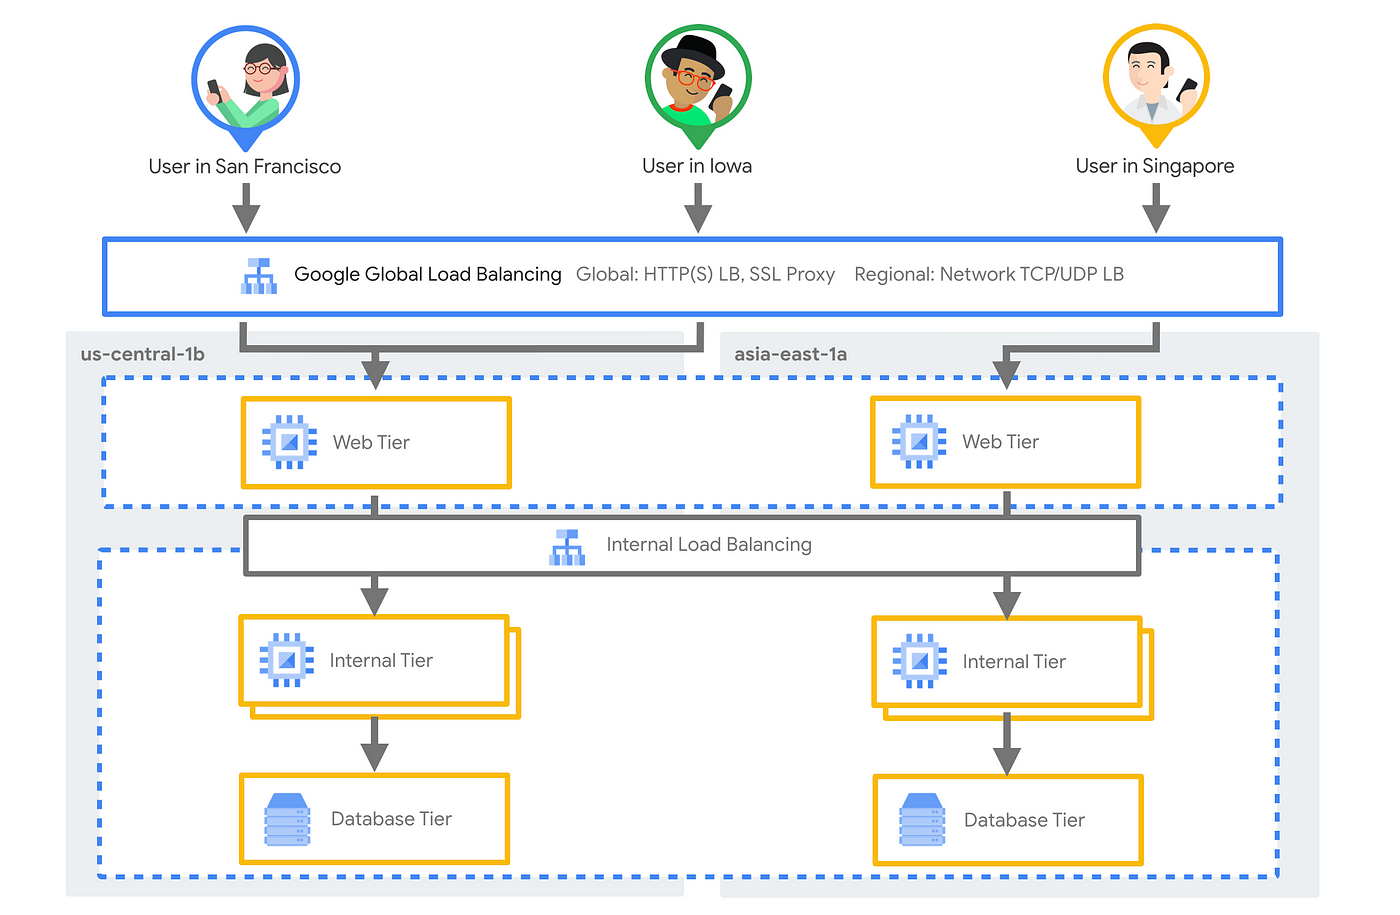
If your WordPress audience spans the globe, you’d want to route users to servers closest to them geographically. GCP Load Balancer supports this with low-latency routing.
3. Managing multiple instances.
If your WordPress site runs across multiple servers for redundancy and scalability, a load balancer is essential to manage traffic efficiently.
4. High availability and uptime.
With load balancing, even if one instance or server fails, traffic is instantly routed to healthy servers, ensuring uninterrupted service for your visitors.
How Does GCP Load Balancer Work?
At its core, GCP Load Balancer evaluates incoming traffic and divides it among a network of backend servers (often virtual machine instances). It operates at two main levels:
- HTTP/HTTPS Load Balancing: Redirects HTTP(S) traffic while providing advanced features like SSL termination and traffic routing based on URL maps.
- TCP/UDP and Internal Load Balancing: Deals with workloads such as databases or non-HTTP/HTTPS traffic.

Key Processes:
- Traffic Distribution: Based on algorithms such as round-robin or least connections, it routes requests to the right backend instances.
- Health Checks: Regularly monitors the health of backend instances to redirect traffic seamlessly if one fails.
- Autoscaling: Automatically adjusts capacity based on traffic demand.
Whether your WordPress site handles high-volume blog visitors or e-commerce customers, GCP Load Balancer ensures optimal resource utilization.
Benefits of GCP Load Balancer
1. Global Availability: Serve users from the nearest server for faster page load times.
2. High Scalability: Easily accommodate growing website traffic without investing in additional hardware.
3. Enhanced Reliability: Keep your site online by routing traffic away from failed or misconfigured servers.
4. SSL Offloading: Handles SSL/TLS encryption on the load balancer, reducing the CPU load on backend servers.
5. Integrated Monitoring: GCP’s native monitoring tools provide real-time insights into traffic, backend health, and bottleneck resolutions.
When Should You Implement Load Balancing?
Load balancing isn’t necessary for every WordPress site. However, it becomes invaluable in the following scenarios:
- High traffic: WordPress sites or e-commerce platforms that regularly see thousands of concurrent visitors.
- Global audience: Sites catering to users in multiple countries, requiring low latency across different regions.
- Fluctuating traffic patterns: Campaign sites or blogs that experience traffic surges during specific events.
- Reliability-critical operations: Websites where uptime is mandatory to maintain user trust (e.g., banking or healthcare sectors).
Setting Up Load Balancing on a WordPress Site
Integrating GCP Load Balancing into your WordPress setup may seem daunting, but it’s straightforward when broken into manageable steps:
Step 1: Set Up Virtual Machine Instances
- Launch WordPress on Google Cloud Compute Engine Virtual Machines (VMs).
- Configure multiple VMs to host your WordPress site for redundancy.
Step 2: Enable Health Checks
- Configure health checks in GCP to monitor the health of your backend instances.
- Specify parameters such as response time, protocol (HTTP/TCP), and request frequency.
Step 3: Create a Backend Service
- Add your WordPress instances to a backend service in GCP.
- Ensure these instances share a common port for HTTP traffic.
Step 4: Choose a Load Balancing Type
- Select an HTTP/HTTPS Load Balancer to manage web traffic effectively.
- Alternatively, if your setup includes database workloads, consider TCP Load Balancer.
Step 5: Set Up a Frontend Configuration
- Define a public IP address and domain to route incoming traffic.
- Enable SSL certificates if required, to secure communication between users and your site.
Step 6: Establish URL Mapping
- Configure URL paths to direct traffic based on behavioral rules (e.g., direct /blog traffic to a specific instance).
Step 7: Test Your Setup
- Ensure everything works smoothly by testing with simulated traffic before going live.
Step 8: Monitor and Optimize
- Use GCP’s monitoring tools to analyze performance and make adjustments as needed.
Challenges While Implementing Load Balancing
Implementing load balancing isn’t without its challenges. Here are a few common obstacles developers face:
1. Complexity in configuration: Setting up load balancing involves managing DNS changes, SSL certificates, and backend services, which may require technical expertise.
2. Higher costs: Implementing GCP Load Balancer requires an additional financial investment. However, the benefits often outweigh the costs for businesses with heavy traffic.
3. Troubleshooting issues: Diagnosing configuration missteps or firewall rules may require close familiarity with GCP’s tools and documentation.
4. Dynamic content challenges: When a single backend is responsible for delivering frequently changing content (e.g., cart items in e-commerce), caching and synchronization among servers can be complex.
Build a Faster, More Reliable WordPress Site Today
GCP Load Balancer is a game-changer for WordPress developers, system administrators, and businesses aiming to scale efficiently. By implementing load balancing, you can distribute traffic intelligently, enhance site reliability, and deliver lightning-fast user experiences regardless of where your audience is located.
Whether you’re managing a bustling blog or running an international e-commerce platform, GCP Load Balancer ensures your WordPress site is always one step ahead of traffic demands.
It’s time to fortify your WordPress site with GCP Load Balancer. Take the leap, and watch your website thrive with unmatched performance and uptime. Happy balancing!